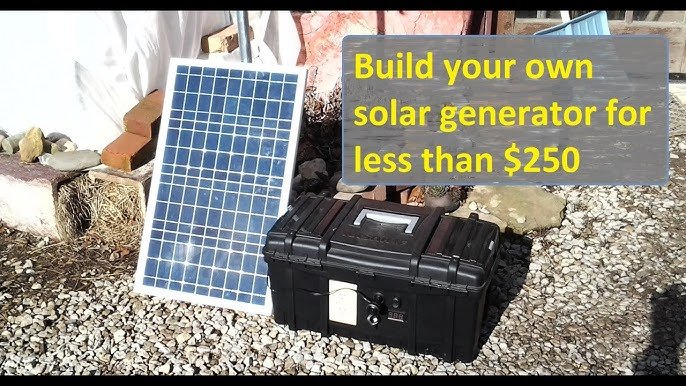
A mini solar generator can power phones, lights, fans, and small appliances. You can build it yourself at home in India. It provides clean, portable electricity during outages or trips. This article shows you how.
1. Plan Your Power Needs
Start by listing devices you need to power: lights, phone charger, small fridge, fan, or laptop. Look at their wattage and how many hours you’ll use them. Multiply watts × hours to get watt-hours (Wh).
Also consider surge power—the extra power needed when something like a motor starts. For example, a 60 W fridge might need 180 W at startup.
Once you have total Wh, add a 20% buffer. This helps you pick the right solar panel size and battery capacity.
2. Choose Components for Your Solar Generator Kit
a) Solar Panel
Use a 100–150 W monocrystalline panel. Monocrystalline is efficient and compact, ideal for tight spaces.
b) Solar Charge Controller
Pick an MPPT charge controller, preferably 10–20 A. It protects your battery and maximises power from panels.
c) Battery
Use a 12 V deep-cycle lithium-ion or lead-acid battery, around 100 Ah. Lithium-ion is lighter and lasts longer but costs more.
d) Inverter
Use a pure sine wave inverter, rated for your peak load. A 500–1,000 W inverter can run most home appliances.
e) Housing
Use a portable toolbox or plastic case to store everything neatly and safely.
f) Wiring & Safety
You will need cables, fuses, circuit breaker, bus bars, MC4 connectors, and earthing kit. Also keep tools like wire cutters and zip ties ready.
3. Build Assembly
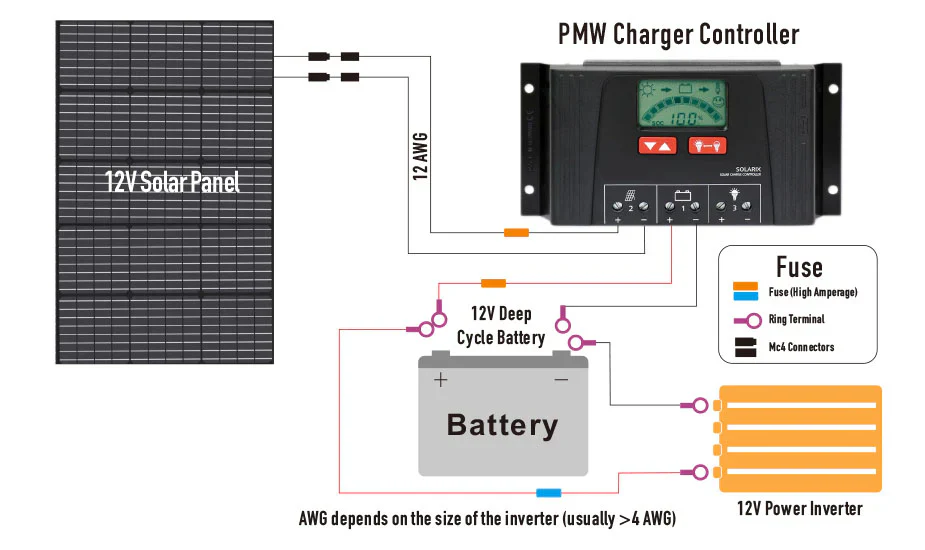
Step 1: Set Up the Battery
Fix the battery in the box. Connect a fuse near the battery’s positive terminal.
Step 2: Install Charge Controller
Mount the controller inside the box. Connect panel leads to controller’s PV input, and controller output to battery using proper cables.
Step 3: Connect the Inverter
Use thick cables from the battery to the inverter. Keep cables short to reduce energy loss.
Step 4: Add a DC Output
Install a DC output port (like 12 V car socket) for small gadgets.
Step 5: Wire AC Outlet
Wire the inverter output to AC sockets on the enclosure.
Step 6: Create a Wiring Diagram
Draw a wiring diagram. Label panel, controller, battery and inverter connections. This prevents mistakes.
Step 7: Secure All Connections
Use cable clamps and grommets to tidy wires. Ensure tight connections and secure bolt fittings.
4. Safety and Testing
Test During Assembly
Check each subsystem (panel, battery, inverter) separately before final installation.
First Charge
In daylight, connect the solar panel. Watch the controller display to ensure proper voltage and current charging.
Inverter Test
Plug in a light or phone charger to test inverter output.
Monitor Battery Levels
Check voltage while transferring power. Verify if the controller shows full charge and inverter runs without issues.
5. Portable Use and Mounting
Mounting the Panel
Use stands or brackets to angle the panel 10–30° southward. This maximises sun capture in most regions of India.
Transportation
Keep the box and panel secured during travel. Avoid heavy bumps. Use straps to fasten panel to racks.
Maintenance
Clean panel monthly with cloth and water. Check cables, fuse, and terminal connections regularly. Perform an annual deep check.
6. Expected Cost in India
| Component | Approx. Cost (₹) |
|---|---|
| 150 W solar panel | 8,000 – 12,000 |
| MPPT controller (15 A) | 3,000 – 6,000 |
| 12 V 100 Ah battery | 10,000 – 18,000 |
| 800 W pure sine inverter | 5,000 – 10,000 |
| Enclosure & wiring | 2,000 – 4,000 |
| Total | ₹28,000 – ₹50,000 |
Higher quality lithium batteries and MPPT controllers increase costs but improve reliability and lifespan.
7. Use Cases in India
- Home backup during power outages
- Camping or road trips with portable solar
- Charging phones, fans, LED lights at construction sites
- Studying at night in rural areas
This mini solar generator is compact, reliable, and suited to Indian power challenges.
FAQs
Q. What size battery do I need?
A. Battery size depends on your watt-hour calculation. A 100 Ah 12 V battery stores about 1,200 Wh—sufficient for 5–6 hours of fan and light use.
Q. Why is an MPPT controller better?
A. MPPT is 15–30% more efficient than PWM. It extracts more power from panels, which is ideal in Indian heat and weather.
Q. Can I power home appliances?
A. Yes, you can run phones, lights, fans. Use a high-quality inverter for fridges or TVs. Continuous heavy loads need bigger systems.
Q. How long does the battery last?
A. Lead-acid lasts 3–5 years with deep cycles. Lithium-ion can last 10–15 years with proper care.
Q. Is it legal to build my own solar generator?
A. Yes, as long as it’s for personal use and follows safety rules. Do not feed power into the main grid without approval.
Q. Can I expand later?
A. Yes. You can add more solar panels, batteries, or upgrade the inverter. Just match voltage and capacity accordingly.
Final Thoughts
Building a DIY solar generator in India gives you clean, independent power. It is great for homes, travel, emergencies, and off-grid scenarios. With budget-friendly parts, wiring know-how, and safety steps, you can build one for under ₹50,000.
If you’re interested, I can help with parts lists, wiring diagrams, or vendor suggestions. Ready to power up your independence with solar?
Author- Ayush